| Voir le sujet précédent :: Voir le sujet suivant |
| Auteur |
Message |
Claude Moinier
Apprenti Posteur


Inscrit le: 29 Mai 2009

Localisation: Pays-Bas
Âge: 75

|
 Posté le: 15/01/2012 18:47 Sujet du message: Posté le: 15/01/2012 18:47 Sujet du message: |
  |
|
|
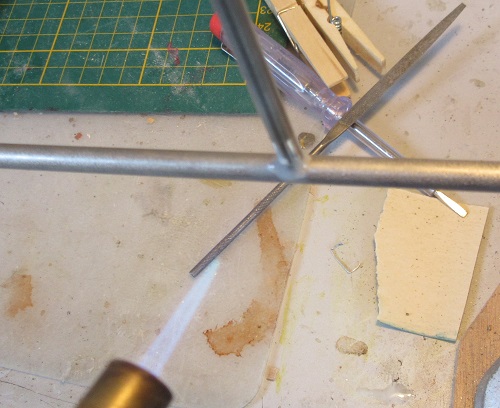
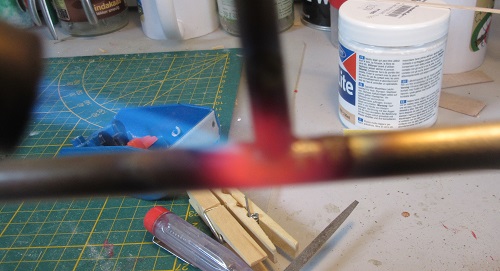
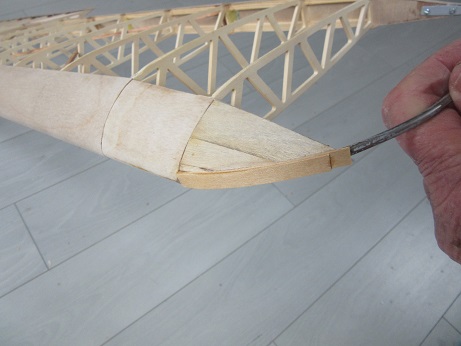
Bonjour,
Suite avec la brasure des montants avant.
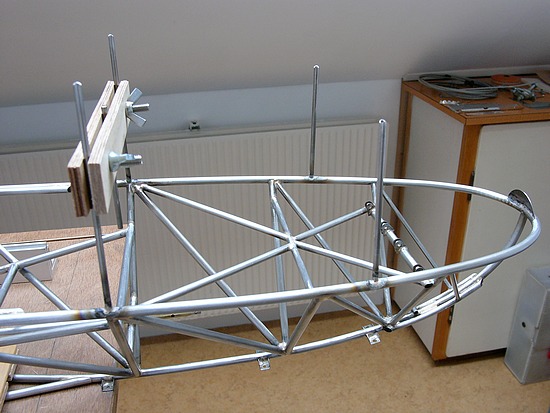
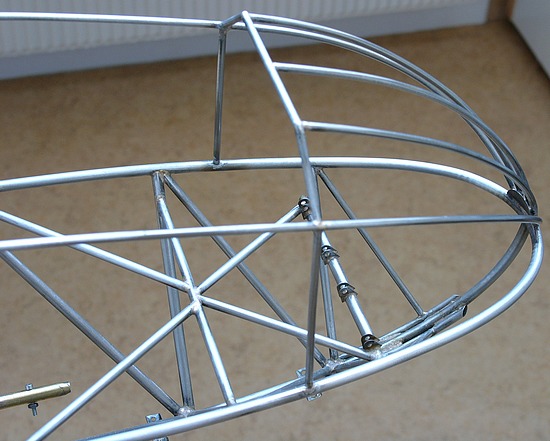
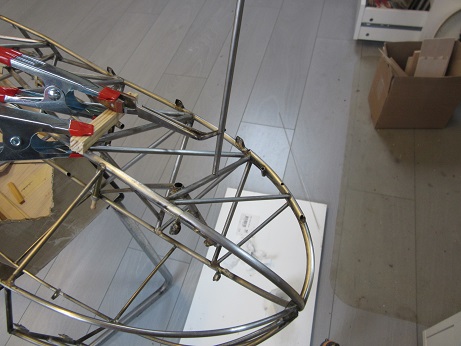
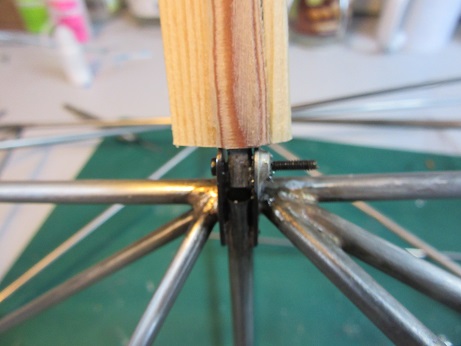
Préparation des deux premiers tubes du carénage. Le cintrage correct des tubes cest avéré plus facile quanticipé ![[oouf]](images/smiles/oouf.gif)
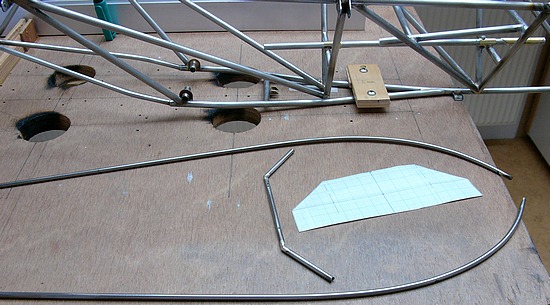
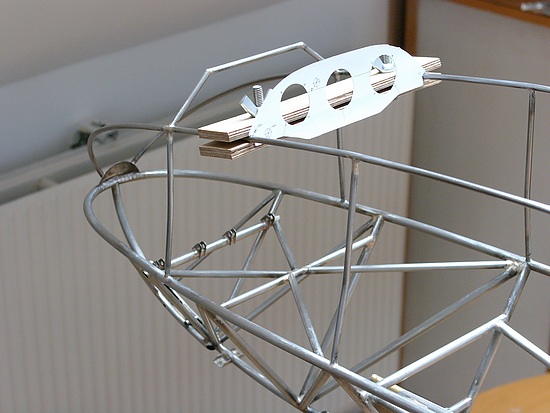
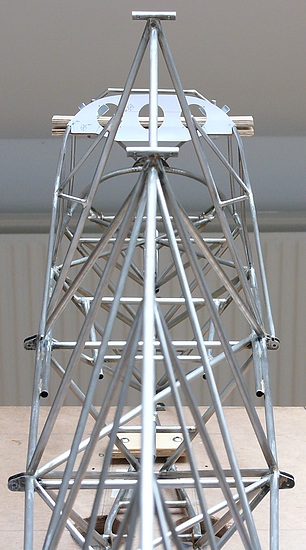
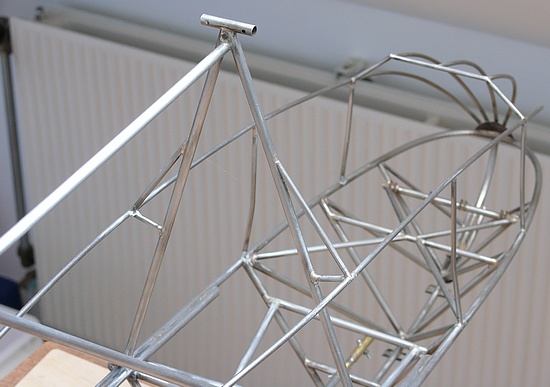
Les longerons latéraux du carénage sont brasés ainsi que le support pour les tubes du museau qui donneront la forme caractéristique à facettes du nez. Le fuselage commence à être volumineux mais reste raisonnable.
À bientôt,

I Fly without Engine
ClaudeM |
|
| Revenir en haut de page |
|
 |
VincentB
Serial Posteur


Inscrit le: 23 Jan 2006

Localisation: Hérault
Âge: 62

|
| Posté le: 15/01/2012 20:54 Sujet du message: |
|
|
|
On voit qu'il n'y a rien de vrillé, ça file droit ![[good]](images/smiles/good.gif)
Retroplane et modélisme en pause, vanlife à haute dose. |
|
| Revenir en haut de page |
|
|
Claude Moinier
Apprenti Posteur
Inscrit le: 29 Mai 2009
Localisation: Pays-Bas
Âge: 75
|
| Posté le: 12/02/2012 15:18 Sujet du message: |
|
|
|
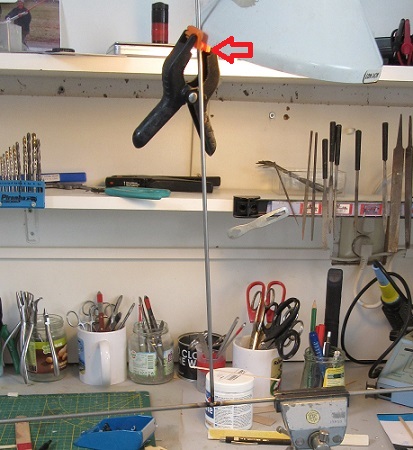
Bonjour,
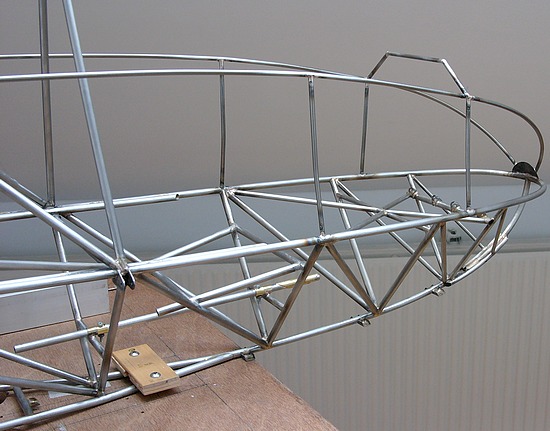
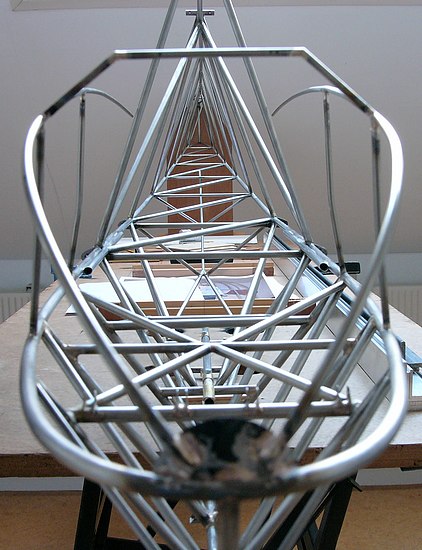
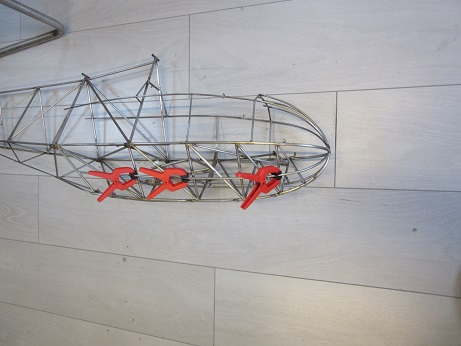
Enfin du temps libre pour continuer la construction. Ici les lisses hautes avec leurs entretoises à larrière de la cabine.
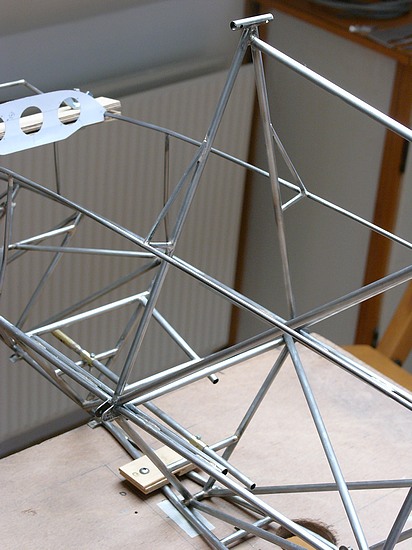
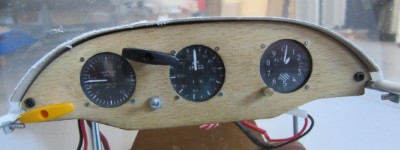
Pour se faire plaisir, présentation du tableau de bord (en papier !).

Sympa, la cabine commence à prendre forme.
Vue depuis le montant de dérive. Ça fait beaucoup de tubes !
À bientôt,
I Fly without Engine
ClaudeM |
|
| Revenir en haut de page |
|
|
Fotor
Stagiaire Posteur


Inscrit le: 26 Mar 2010
Âge: 51

|
| Posté le: 26/06/2012 14:11 Sujet du message: |
|
|
|
| Claude, any progress in your project?? |
|
| Revenir en haut de page |
|
|
Claude Moinier
Apprenti Posteur
Inscrit le: 29 Mai 2009
Localisation: Pays-Bas
Âge: 75
|
| Posté le: 04/11/2012 13:21 Sujet du message: |
|
|
|
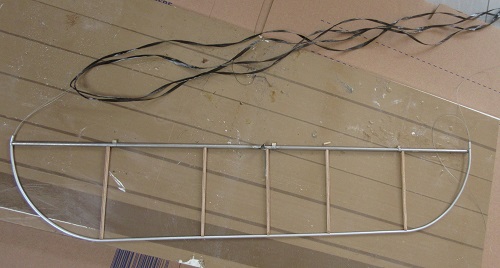
Bonjour à tous,
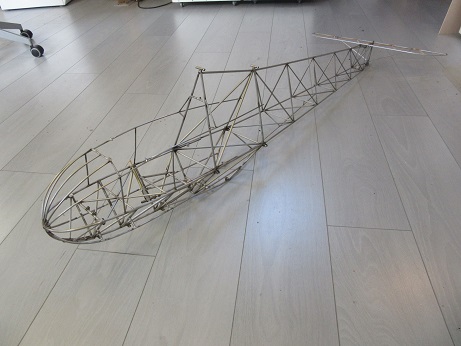
Après une longue période dabsence sur le forum, enfin reprise de la construction du Schweizer 1- 19. Le nez du fuselage est maintenant achevé et reste à poser les lisses basses en tube de 3mm. Des entretoises seront brasées entre les lisses et les croisillons pour la mise en forme et rigidité.
À bientôt,

I Fly without Engine
ClaudeM |
|
| Revenir en haut de page |
|
|
VincentB
Serial Posteur
Inscrit le: 23 Jan 2006
Localisation: Hérault
Âge: 62
|
| Posté le: 04/11/2012 13:44 Sujet du message: |
|
|
|
Bonjour Claude, ça fait plaisir de te revoir sur le forum 
Pour l'empennage tu penses finalement le faire en alu ou en inox?
Retroplane et modélisme en pause, vanlife à haute dose. |
|
| Revenir en haut de page |
|
|
Claude Moinier
Apprenti Posteur
Inscrit le: 29 Mai 2009
Localisation: Pays-Bas
Âge: 75
|
| Posté le: 05/11/2012 20:38 Sujet du message: |
|
|
|
Bonjour Vincent,
Finalement jai découvert que sur certaine version le plan fixe vertical et la dérive étaient fabriqués en bois, ce que je vais faire. Concernant le plan fixe horizontal et le volet de profondeur, tube inox avec nervures en bois bien plus facile à maîtriser que l' aluminium.
A+
I Fly without Engine
ClaudeM |
|
| Revenir en haut de page |
|
|
VincentB
Serial Posteur
Inscrit le: 23 Jan 2006
Localisation: Hérault
Âge: 62
|
| Posté le: 05/11/2012 20:44 Sujet du message: |
|
|
|
Et surtout l'aluminium ça n'a pas de tenue au choc. Stab inox/bois ce sera collé?
Retroplane et modélisme en pause, vanlife à haute dose. |
|
| Revenir en haut de page |
|
|
Claude Moinier
Apprenti Posteur
Inscrit le: 29 Mai 2009
Localisation: Pays-Bas
Âge: 75
|
| Posté le: 07/11/2012 20:59 Sujet du message: |
|
|
|
Vincent,
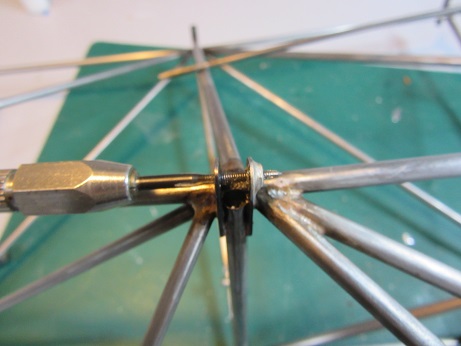
Sur le stab en inox/bois les nervures seront collé à lAraldite chargé de poudre pour faire léger. Les charnières du volet de profondeur seront bien sûr brasées sur les tubes comme sur le grandeur!
I Fly without Engine
ClaudeM |
|
| Revenir en haut de page |
|
|
bocorvin
Maniaco Posteur


Inscrit le: 17 Aoû 2015
Localisation: Hillegom
Âge: 79

|
| Posté le: 01/05/2024 17:25 Sujet du message: |
|
|
|
Hello everyone,
Claude is a very good friend and member of the same aeroclub. Also the builder of this beautiful fuselage. He got grandchildren, which takes a lot of time and the fuselage of the SGU 1-19 just rested . I thought that was a pity (so nicely built) and offered to finish the glider. Claude agreed and he brought all the stuff of the Schweizer to me. I admiring his fuselage once again and started to read how this glider was constructed.
I write it in English, French is still to tricky for me....
Besides the fuselage of tubular steel, I think the empennages were made of of metal and wings of wood. Maybe there were other versions, I am not sure. Claude also brought a lot of info and drwings, very good!
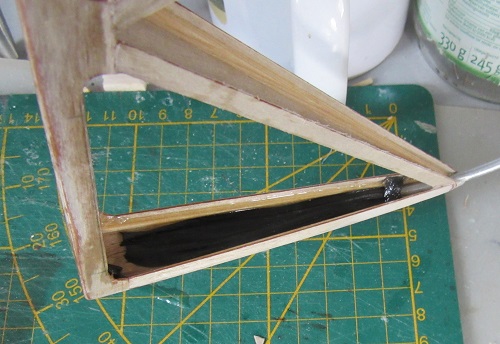
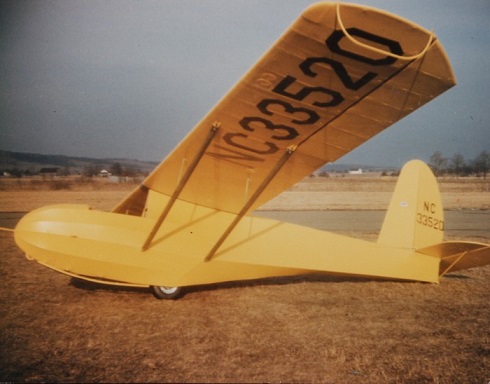
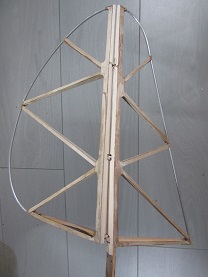
I started with the empennages. After the necessary research, I presumed that they were made of steel tube for the LE and TE and the ribs of tapered "U" profiles of bent metal plate, see photo of the original.
The main spar of the fin and rudder are also made in this way
I decided to imitate these ribs and spars by imatating the U profiles of 0.4mm plywood with battens in the corners. Because this "airfoil" does not exist in Devwing, I couldnt draw it digitally. So I started with strips of plywood directly on the drawing.
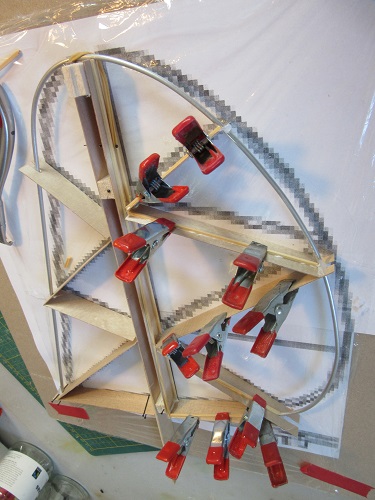
After the battens (2x2mm) were glued to the plywood and the glue was dry, I cut away the excess plywood and glued other strips on it, to imitate the U profile
I didn't have a 3mm stainless steel tube lying around and took 3mm aluminium tube, through which I wanted to pull carbon rovings with epoxy later I pulled rovings (4X) through the aluminum tube continuing on the bottom rib. (See the following report of the horizontal stabilizer)
Before I am putting the diacov on, I want to spray the whole thing in the same color, just as the real thing.
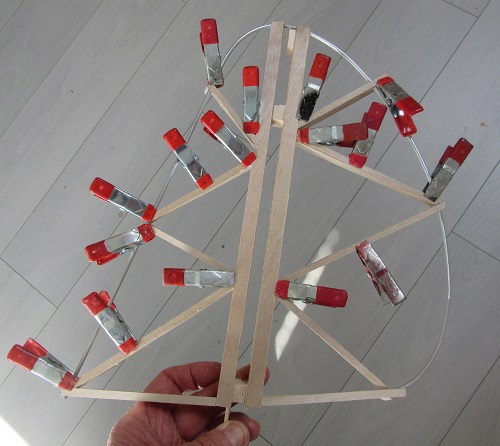
The horizontal stabilizer,
The construction of this resembles the fin and rudder, only the main spar is a tube, with struts, see the original drawing
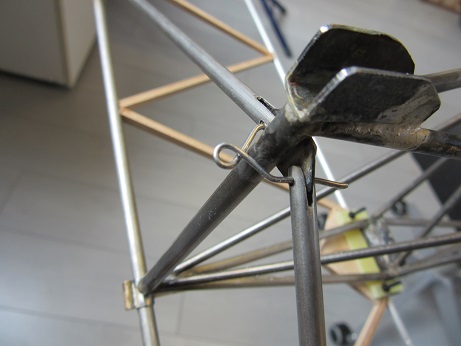
The hinges are small tubes welded onto sleeves, which in turn are welded over the main tube. I imitated this by soldering a 2.5mm brass tube to a 6mm stainless steel tube.
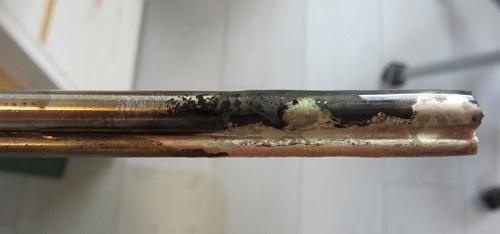
With a diamond disc I slit the tube at the back to get it to fit. Then I sawed off pieces of 5mm and slid them over the 5mm main spar tube.
A nail is the hinge pin for the time being. For the rudder horn I soldered a tube perpendicular to the main beam.
For the rudder horn I soldered a tube perpendicular to the main beam. I used my working light to temporary fix it.
The ribs (of the original) are also made of bent metal plate, forming a U and are therefore also straight, but tapered. Because they are very small, Adri milled them out of 3mm sturdy plywood. I glued them to the stainless steel tube with thick cyano.The TE and LE are made of 3mm aluminium tube, which is easy to bend. Then I pulled 4 rovings through it with a double thin flexible steel wire
The complete stabilizer
and put on temporary for the photo on the fuselage.
.
the original

Finally the weather is getting better, so I think the progress will not be fast this summer
Vincent (DB) |
|
| Revenir en haut de page |
|
|
VincentB
Serial Posteur
Inscrit le: 23 Jan 2006
Localisation: Hérault
Âge: 62
|
| Posté le: 01/05/2024 18:46 Sujet du message: |
|
|
|
Bonjour Vincent, c'est super que tu ais repris la superbe construction de Claude, commencée il y a 13 ans déjà, que le temps passe vite....
on va suivre ça avec intérêt ![[clap]](images/smiles/Clap.gif)
Retroplane et modélisme en pause, vanlife à haute dose. |
|
| Revenir en haut de page |
|
|
bocorvin
Maniaco Posteur
Inscrit le: 17 Aoû 2015
Localisation: Hillegom
Âge: 79
|
| Posté le: 01/05/2024 20:46 Sujet du message: |
|
|
|
Hello Vincent,
Thanks for your encouraging words, Claude did such a good job, I am glad to go on with the build
Vincent (DB) |
|
| Revenir en haut de page |
|
|
bocorvin
Maniaco Posteur
Inscrit le: 17 Aoû 2015
Localisation: Hillegom
Âge: 79
|
| Posté le: 13/11/2024 20:01 Sujet du message: |
|
|
|
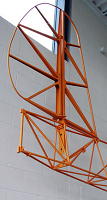
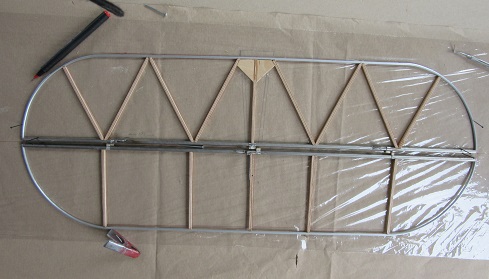
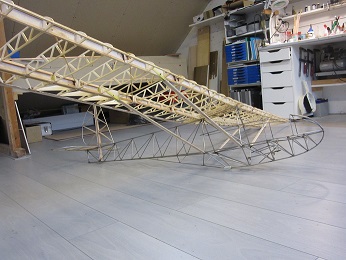
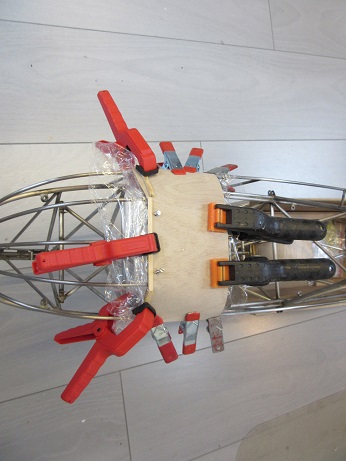
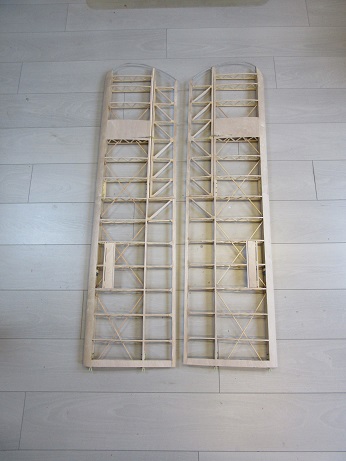
This week I started again with the Schweizer.
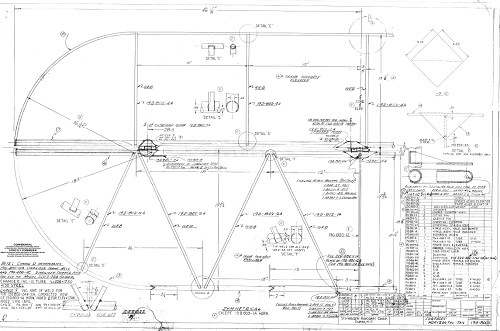
With the parts I got from Claude, were also the ribs of the wing. It took some figuring out how the wing should be constructed, because this wing is different than I'm used to. It has a very small D box, the torsional stiffness comes from two substantial beams that, along with two struts, form a rigid structure. To make it strong in the horizontal plane, the original wing has cross bracing of steel wires with metal tubes to absorb the compression of the cross wires.
I chose a slightly simpler solution by replacing the steel wire with 3X3mm spruce battens.
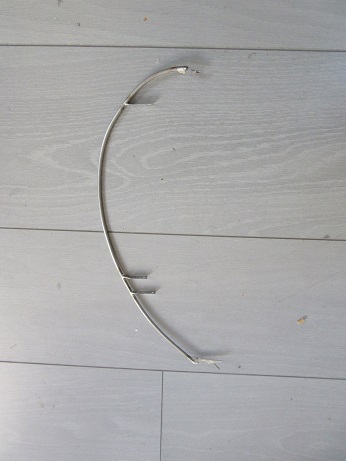
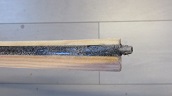
The tip list is also a bent tube, which was screwed to the wooden beams with metal strips. I had accidentally extended it to the LE, I didnt look closely to the original.
soldering the metal strips, looking for some support when soldering!
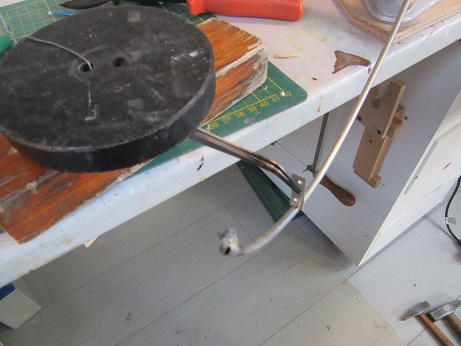
So, I cut the tube and removed the front piece. Instead, I put a balsa block that I shaped and sanded.
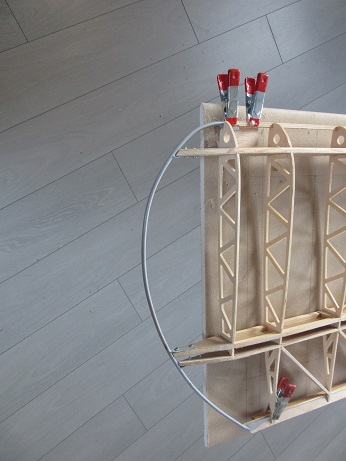
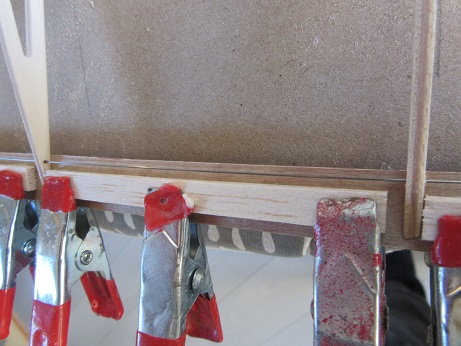
The TE is constructed from plywood on the top and bottom, filled with balsa. I also threaded a thin steel wire through it, and I'm going to fill that front section with thickened epoxy to make it a bit sturdier.
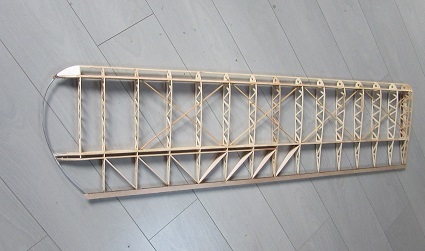
Next is the other wing, and then finishing both wings after a trial fit.
Vincent (DB) |
|
| Revenir en haut de page |
|
|
bocorvin
Maniaco Posteur
Inscrit le: 17 Aoû 2015
Localisation: Hillegom
Âge: 79
|
| Posté le: 27/11/2024 17:33 Sujet du message: |
|
|
|
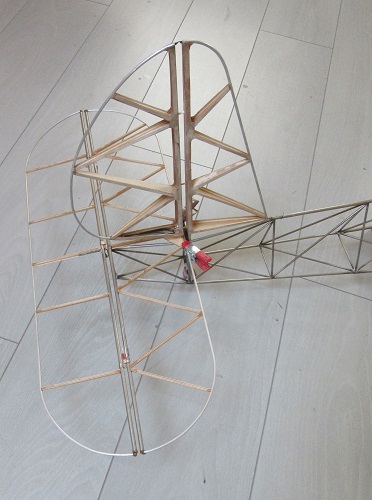
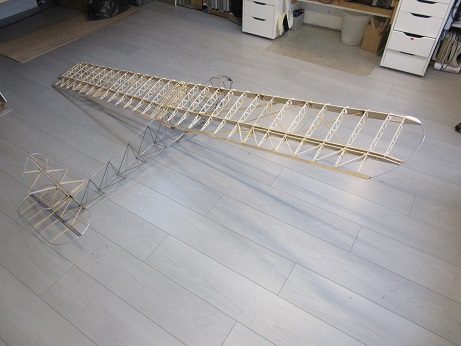
The other wing went a bit faster, gluiing all the gusset plates and temporarily mounting the fittings.
Adri CNC milled the fittings from epoxy sheet, which is much more precise than I can make by hand. Then the struts, I wanted to use stainless steel tubing for that, but that turned out to be much too weak. The struts are subjected to pressure, especially when landing, and I had to come up with something else. I ended up with a composite wood/carbon strut. First a kind of wooden U-profile

made of spruce slats and a strip of 0.4mm plywood. In it a few wet rovings, on top of that 8 double rovings soaked in epoxy, which I pulled through 2 pieces of 4mm stainless steel tubing, another number of rovings and covered that. Ending up with a 5X5mm carbon rod. After hardening on the open side another strip of plywood and that whole thing already roughly profiled.
The horizontal stabilizer attachment still had to be done, I came up with two epoxy "lips" that fit under the strip on the fuselage and 1 central nut through the rear frame tube.
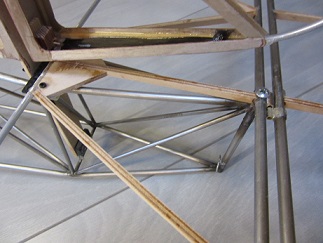
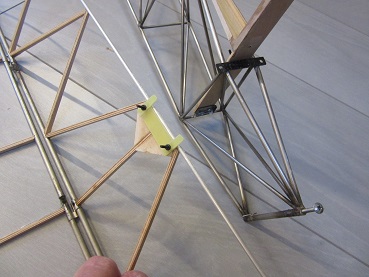
Struts will also be placed under the stabilizer, they will come later. Now that the wing struts were ready, it could be put together for the first time, (mettre en croix) always a nice moment :

Vincent (DB) |
|
| Revenir en haut de page |
|
|
bocorvin
Maniaco Posteur
Inscrit le: 17 Aoû 2015
Localisation: Hillegom
Âge: 79
|
| Posté le: 04/01/2025 18:18 Sujet du message: |
|
|
|
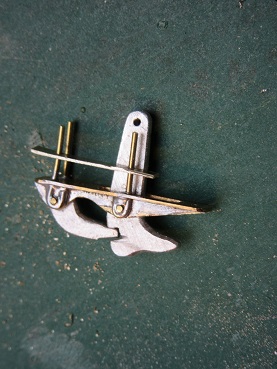
Bonjour a tous,
I could now cut the ailerons free

and glue in the hinge pins. I used 2mm nails, with a 0.5 hole in the middle one for securing with a self-bent clip of 0.4mm steel wire.
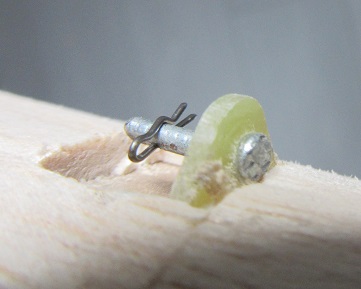
The space between the rear spar and the aileron filled with 3mm balsa and beveled.

Note, it is a trainer, not a performance, as was the case with the original. Now the spoilers, the original ones were small, only over 1 rib space. I decided to make them a bit bigger, over 2 rib spaces. As a basis, spruce strips of 3x5mm and small hinges, filled with 0.4mm plywood.
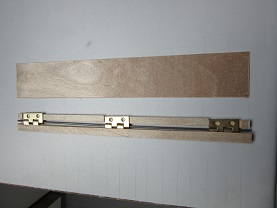
The spoiler itself consists of 0.4 plywood below, 3mm balsa and when I glue the cap strips on the ribs, the top will also have 0.4mm plywood on it.
The actuation; the servo just fit between the upper and lower spar, I have to cut off the mounting lips of the servo. The spars were thickened and a new web plate was glued on.
I could install the aileron servos in the same way.
I did the rudder a little differently, with epoxy sheet hinges, but with a long 0.6mm continuous hinge pin, which was clips over to the upper hinge.
All the control surfaces can move freely, I will continue with the fuselage, lots of things to do there!
Vincent (DB) |
|
| Revenir en haut de page |
|
|
DELRIEUPierre
Psycho Posteur

Inscrit le: 28 Jan 2006
Localisation: Arvert 17530
Âge: 76

|
| Posté le: 05/01/2025 18:05 Sujet du message: |
|
|
|
Salut Vincent , belle construction bravo , quand on goute au tube c'est toujours surprenant, et on ne s'en lasse pas ensuite . tu verras c'est un plaisir en vol de pente ce planeur  Pierre Pierre

Vieilles toiles à Peyresourde et Papy's Flying Club 17 à la Madeleine
Signé les copains |
|
| Revenir en haut de page |
|
|
bocorvin
Maniaco Posteur
Inscrit le: 17 Aoû 2015
Localisation: Hillegom
Âge: 79
|
| Posté le: 05/01/2025 21:16 Sujet du message: |
|
|
|
Merci Pierre
En effet Pierre, travailler avec des tubes est très différent, mais amusant. Heureusement, la soudure est aussi meilleure pour moi, c'est en forgeant qu'on devient forgeron !
(traduit avec Google...)
Vincent (DB) |
|
| Revenir en haut de page |
|
|
ManfredNeu
Accro Posteur


Inscrit le: 02 Jan 2009

Localisation: HalleWestfalen
Âge: 77

|
| Posté le: 06/01/2025 11:29 Sujet du message: |
|
|
|
Großartig, Vincent ![[amen]](images/smiles/amen.gif)
Viele Grüße aus Halle |
|
| Revenir en haut de page |
|
|
bocorvin
Maniaco Posteur
Inscrit le: 17 Aoû 2015
Localisation: Hillegom
Âge: 79
|
| Posté le: 29/01/2025 21:51 Sujet du message: |
|
|
|
Danke Manfred! Entschuldiging fur die spate reaction!
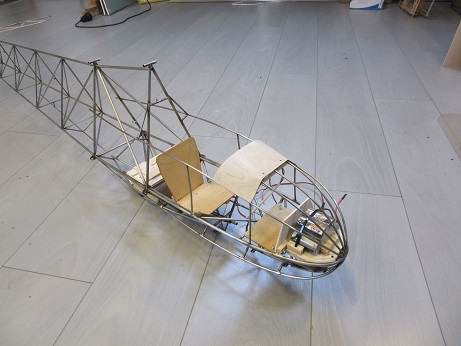
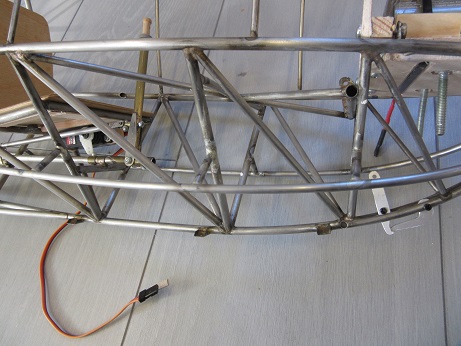
I went om with the fuselage, short pieces of tube to feed the elevator bowden cable, which is handy with steel tube!
Nuts to secure the seat and the servo board

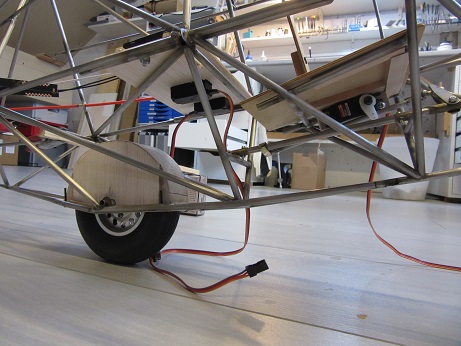
I also made a wheel arch.

Then a lot of metal plates to mount the necessary woodwork, cut from an old PC cabinet and then filed to shape.
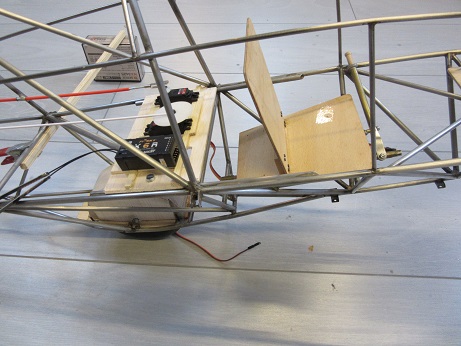
After some puzzling, I made a wooden panel to attach the instrument panel and windshield
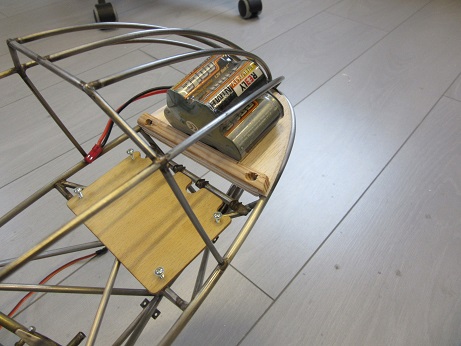
The decoupling servo could be nicely placed under the seat. In the nose a (removable) shelf with receiver battery and place for ballast underneath.
Elevator servo with push/pull and rudder servo with pull/pull cables fit on a shelf behind the seat, just accessible when the fuselage is sheeted.
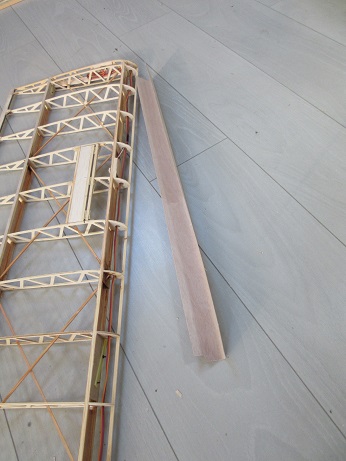
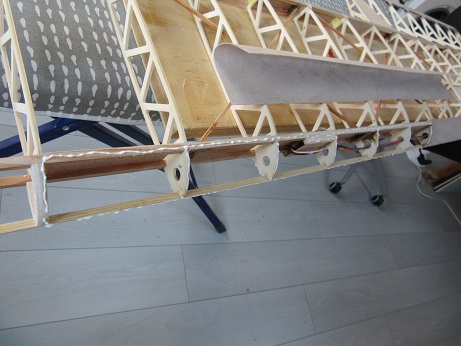
There were still 2 stringers to make at the bottom of the nose to form the nose. I started with the supports
and then the stringers itself
and the result
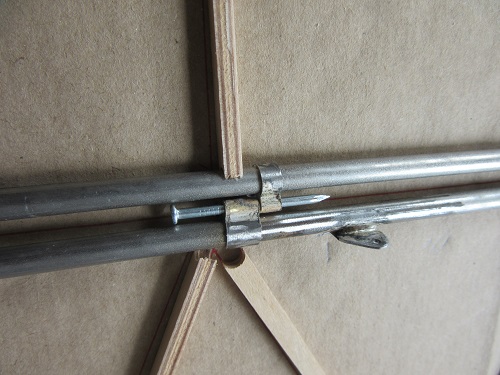
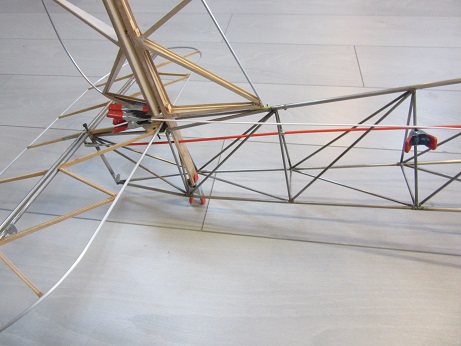
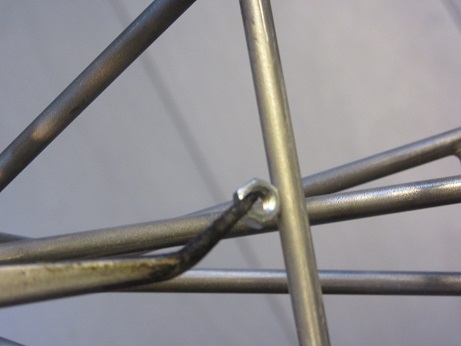
The the necessary details; to make the struts easy to disassemble I soldered M2 nuts on the brackets and they of course filled up with silver when soldering. So I drilled them with 1.5mm and tapping thread with a tap in a hand drill holder, I could put it flat enough against the fuselage. I admired Claude's soldering skills, great job Claude!!!
Now I won't lose M2 nuts on the field...
The plan is to leave the struts permanently attached to the wings. I want to secure the wing root with 1 long 2mm pin (per side).
Then the stabilizer struts, which come with M2 bolts permanently on the stabilizer and with a 1mm steel wire clip on the fuselage. A hardwood skid will fit in the U-shaped metal profile at the rear of the fuselage.
Trial fit of the wooden components.
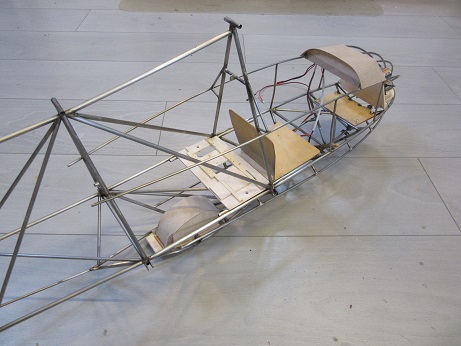
It is almost ready to paint, will it be spraying or brushing? I'm going to think about that.
It is now up finishing the wings.
Vincent (DB) |
|
| Revenir en haut de page |
|
|
sebastian92
Serial Posteur

Inscrit le: 01 Sep 2015
Localisation: Hauts de seine
Âge: 62
|
| Posté le: 30/01/2025 21:04 Sujet du message: |
|
|
|
Super Vincent
C'est vraiment très beau ces structures en tubes ; et je constate encore que le poids / rigidité obtenu est très intéressant par rapport aux structures tout bois
Peut-être un jour je testerais ces structures en tube ? ça demande quand même pas mal de préparation de chantier pour avoir quelque chose de propre ; un jour peut-être
Pourvu que ça vole, roule, flotte ! normalement j'ai tout bien fait pour
Un bel avion est un avion qui vole bien ! Marcel Dassault
Sebastian
Vends module émission 2.4 ghz pour Futaba, Hitec TZ-FM + 2 récepteurs corona 8 voies (contact en MP)
|
|
| Revenir en haut de page |
|
|
DELRIEUPierre
Psycho Posteur
Inscrit le: 28 Jan 2006
Localisation: Arvert 17530
Âge: 76
|
| Posté le: 06/02/2025 13:50 Sujet du message: |
|
|
|
Hello Vincent tu ne mets pas de crochet de remorquage ?
bravo
Vieilles toiles à Peyresourde et Papy's Flying Club 17 à la Madeleine
Signé les copains |
|
| Revenir en haut de page |
|
|
bocorvin
Maniaco Posteur
Inscrit le: 17 Aoû 2015
Localisation: Hillegom
Âge: 79
|
| Posté le: 06/02/2025 14:32 Sujet du message: |
|
|
|
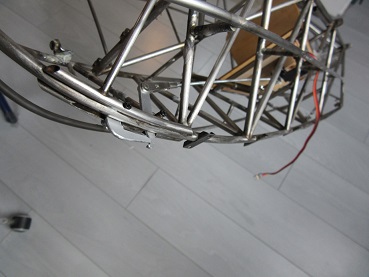
Bonjout Pierre,
Surement je fais un crochet de remorquage,, nous n'avons pas beaucoup de pentes ici 
Claude fait des preparations
Le servo est juste au sous (under) le pilote.
I still must make a push/pull rod to connect the servo with the uncoupler.
Vincent (DB) |
|
| Revenir en haut de page |
|
|
patte de loup
Incurable Posteur


Inscrit le: 25 Jan 2006
Localisation: Alsace (Strasbourg)
Âge: 67

|
| Posté le: 07/02/2025 10:38 Sujet du message: |
|
|
|
Salut Vincent,
bien joli ce crochet
Pat'
Un "prédateur" des pentes de France et de Navarre |
|
| Revenir en haut de page |
|
|
sebastian92
Serial Posteur
Inscrit le: 01 Sep 2015
Localisation: Hauts de seine
Âge: 62
|
| Posté le: 07/02/2025 12:36 Sujet du message: |
|
|
|
Hello Vincent,
ok pour joli
mais
suffisamment efficace et sécurisé ??? j'ai de gros doutes ![[humm]](images/smiles/humm.gif)
Tout le reste de la structure par ailleurs
Pourvu que ça vole, roule, flotte ! normalement j'ai tout bien fait pour
Un bel avion est un avion qui vole bien ! Marcel Dassault
Sebastian
Vends module émission 2.4 ghz pour Futaba, Hitec TZ-FM + 2 récepteurs corona 8 voies (contact en MP)
|
|
| Revenir en haut de page |
|
|
bocorvin
Maniaco Posteur
Inscrit le: 17 Aoû 2015
Localisation: Hillegom
Âge: 79
|
| Posté le: 07/02/2025 15:50 Sujet du message: |
|
|
|
Hello Pat,
Thanks for your comment ,
Hello Sebastian,
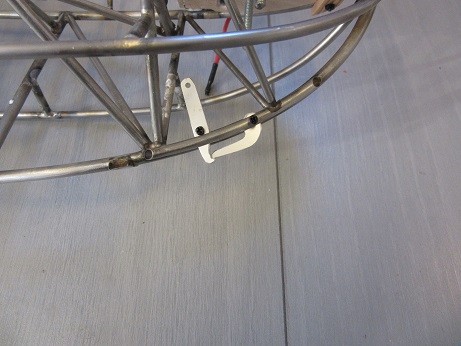
If I understand you correctly, you think that the dimension of the retainer hook is very small.
Maybe you have a point and I filed it a bit deeper.
I use the same system on my Nemere 1:6, 330m span, approx 3kg and the hook never failed under tension. (I had other problems with that hook  ) )
To give you an idea about the dimensions, the hard brass "axles" are 0.9mm thick
Now the SGU 1-19
it is now 2mm deep, I guess its amply sufficient
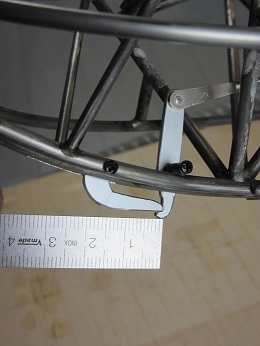
The force on the retainer hook is very small, much less than the tow rope.
Amicalement,
Vincent (DB) |
|
| Revenir en haut de page |
|
|
sebastian92
Serial Posteur
Inscrit le: 01 Sep 2015
Localisation: Hauts de seine
Âge: 62
|
| Posté le: 07/02/2025 16:26 Sujet du message: |
|
|
|
hello Vincent,
Yes, you've understood my question ; I was thinking about the depth of the hook notch.
You've corrected it by making it a bit deeper, so the lock will be better !
Bonne continuation
Pourvu que ça vole, roule, flotte ! normalement j'ai tout bien fait pour
Un bel avion est un avion qui vole bien ! Marcel Dassault
Sebastian
Vends module émission 2.4 ghz pour Futaba, Hitec TZ-FM + 2 récepteurs corona 8 voies (contact en MP)
|
|
| Revenir en haut de page |
|
|
bocorvin
Maniaco Posteur
Inscrit le: 17 Aoû 2015
Localisation: Hillegom
Âge: 79
|
| Posté le: 08/02/2025 12:40 Sujet du message: |
|
|
|
Bonjour,
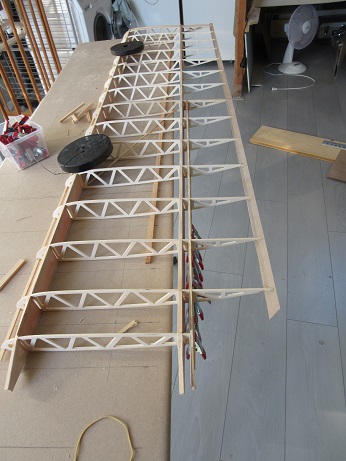
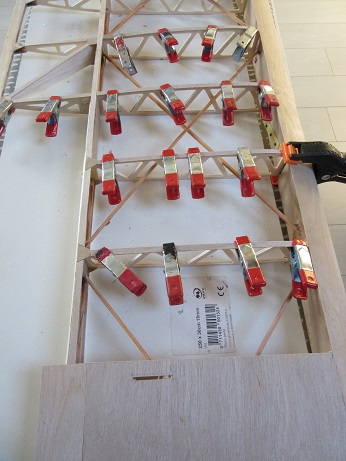
I went on with the wings.
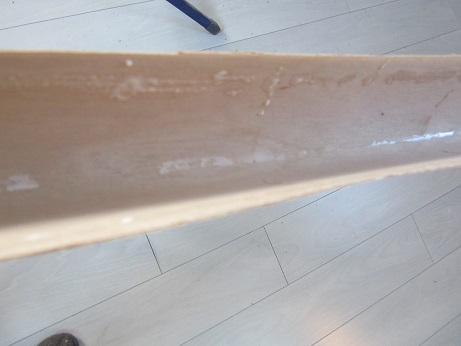
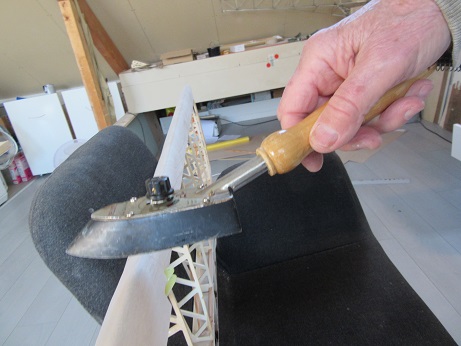
First of all, I wanted to cover the nose with 0.5mm plywood. The airfoil has a sharp bend just below the LE. I wanted to glue the plywood with the "dried white glue, foil iron" method and I found that bend too tight. I bent an oversized strip of plywood into a gutter through which I poured a little boiling water, I repeated that a few times until I had a really tight bend. I let it dry like this .
Explaining is difficult, maybe a video is better, albeit spoken in Dutch
https://www.youtube.com/watch?v=KoZUbuMlBck&list=PLjbfcwxsGi91tDxYtaNhgM6wtcLjU2nLX&index=3
I put white glue on the wing, pressed the plywood on it, took it off and smeared it with a finger from.
After drying I secured the LE with a foil iron at 150gr
then the main beam top and bottom. To make it fit nicely on the beam. I clamped a batten at the top and bottom
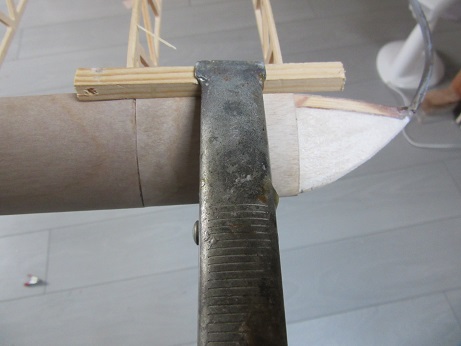
and smeared extra glue in that connection at the back. After curing, I cut off the excess plywood.
The tip was double curved, I glued segments of plywood on
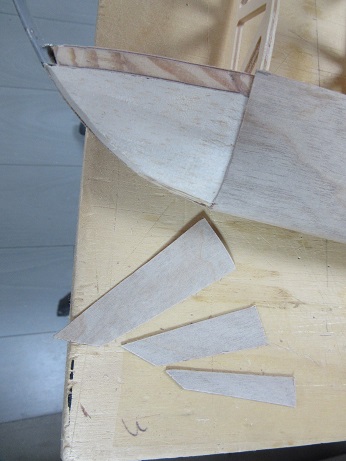

I made the LE from 2 layers of thin spruce.
Then the capstrips, cut from 0.5mm plywood, a lot!
Also the sheeting at the aileron control rod (luckily that works fine).
They are about ready for some coloring (of the balsa) and putting the Diacov on.
Vincent (DB) |
|
| Revenir en haut de page |
|
|
bocorvin
Maniaco Posteur
Inscrit le: 17 Aoû 2015
Localisation: Hillegom
Âge: 79
|
| Posté le: 19/03/2025 17:59 Sujet du message: |
|
|
|
Hello everyone,
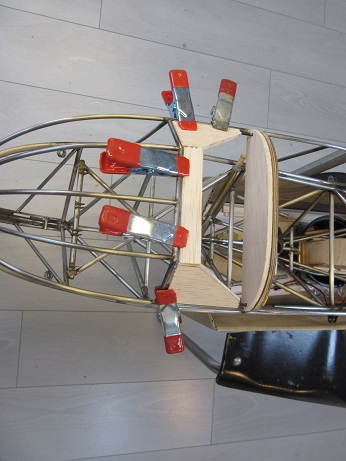
Before sheeting, I mounted the wings to check the length of the struts

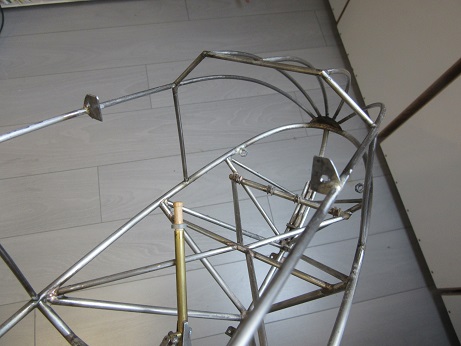
The tubular steel fuselage had to be painted, after some trial and error it became primer with a spray can, too many tubes for the brush!
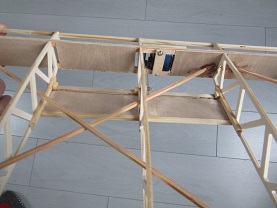
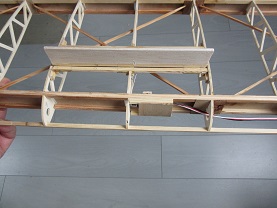
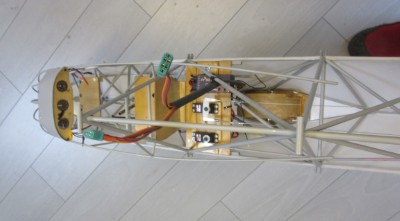
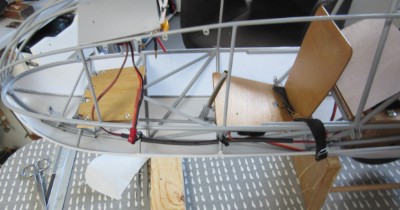
Then fitted the rc components, the battery holder with ballast in the nose
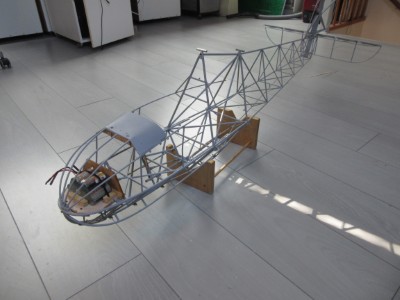
on/off switch
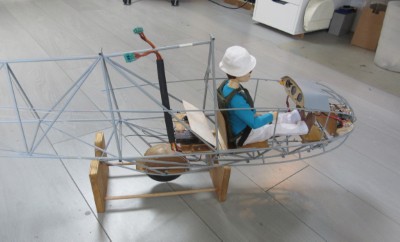
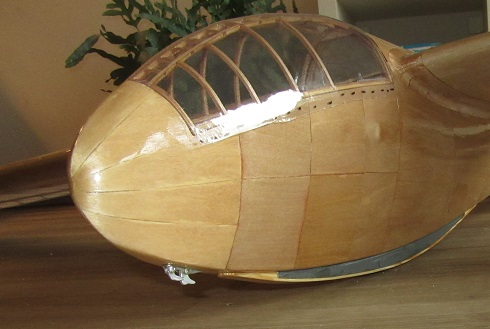
behind the nice instrument panel Claude had made.
The servos and receiver close behind the pilot
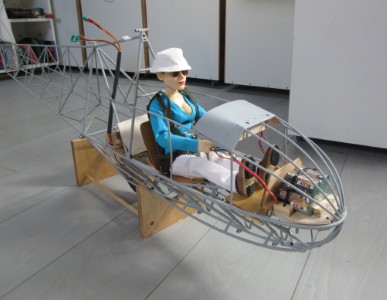
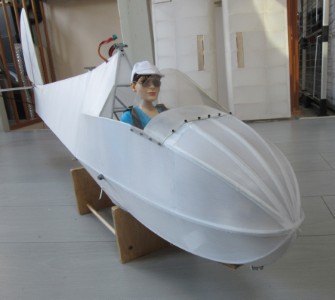
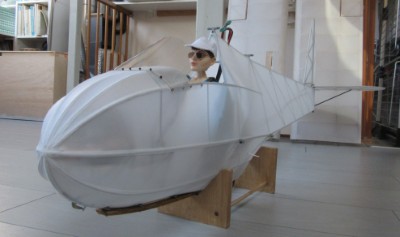
It turned out Claude also had given a nice pilote, which fitted fine (be careful with upside down flights!)

It was ready to be sheeted and for that I chose Diacov. This is a tissue with an adhesive layer. It sticks extremely well, cutting off is difficult because it is a tissue. It is very difficult to cut freehanded neatly. The wings and tail surfaces presented no problem
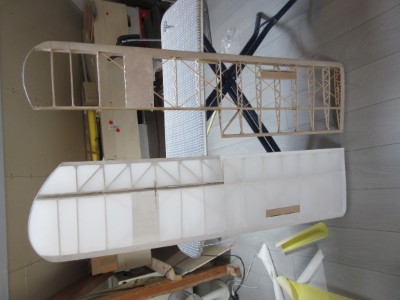
Then the fuselage, the cloth itself went fine, it sticks fantastically, even on the thin tubes, cutting off is not easy.....
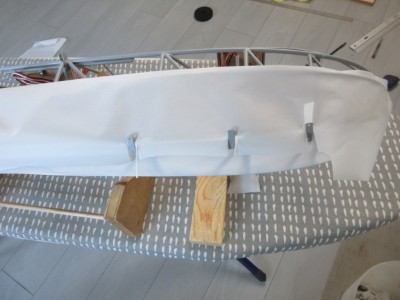

I couldn't get the overlaps on the curved nose neat, so I cut 8mm wide strips and glued them over the seams.
That looked better.
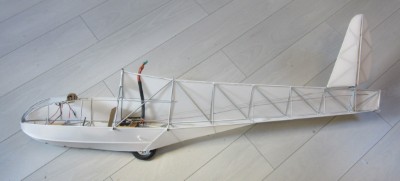
Then to determine the cg. Using Ecalc, I came up with 80- 99mm from the leading edge. About 380gr of lead had to be added, which could nicely be done under the (removable) battery holder. With this ballast, the cg is 92 mm. The glider parked, it stays just rests with its tail on the ground, I can't move the weel and I'd rather not move the cg back yet...... The ready-to-fly weight is 4040grams, so that stays nicely within the 4 - 4.5 kg that Claude had predicted
Now to the painting, which I want to keep to a minimum, the transparency of the model has something anyway. First pictures outside!
It was sunny;
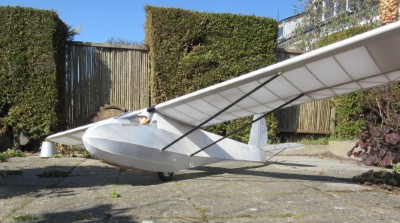
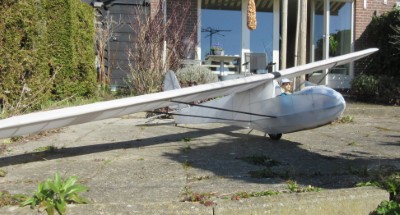

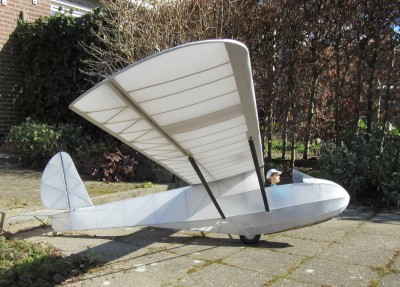
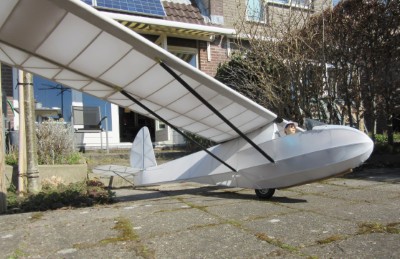
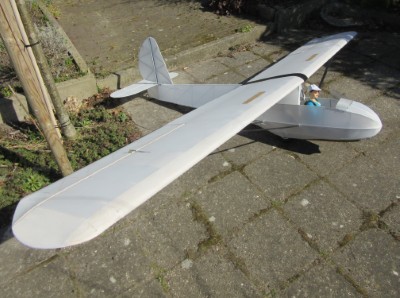
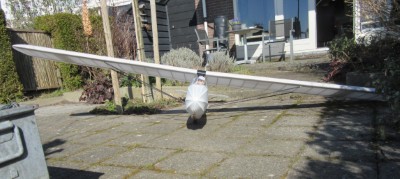
Painting or only lettering, thats the question .
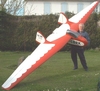
Its ready to fly!
Vincent (DB) |
|
| Revenir en haut de page |
|
|
sebastian92
Serial Posteur
Inscrit le: 01 Sep 2015
Localisation: Hauts de seine
Âge: 62
|
| Posté le: 21/03/2025 15:27 Sujet du message: |
|
|
|
Hello Vincent,
les commentaires étant malheureusement absent
permets moi de te féliciter pour cette nouvelle construction très bien réalisée
Avec toujours des étapes de ta construction que j'apprécie beaucoup et qui renforce nos connaissances !
Pour la déco, it's up to you 
Un lettrage me semble "incontournable" et peut-être une peinture qui donnerais encore plus de volume et de réalisme à ta maquette.
Keep on reporting on your progress and the maiden flight!
Pourvu que ça vole, roule, flotte ! normalement j'ai tout bien fait pour
Un bel avion est un avion qui vole bien ! Marcel Dassault
Sebastian
Vends module émission 2.4 ghz pour Futaba, Hitec TZ-FM + 2 récepteurs corona 8 voies (contact en MP)
|
|
| Revenir en haut de page |
|
|
bocorvin
Maniaco Posteur
Inscrit le: 17 Aoû 2015
Localisation: Hillegom
Âge: 79
|
| Posté le: 21/03/2025 17:22 Sujet du message: |
|
|
|
Hello Sebastian,
Thanks for yout comments . I guess that the maiden will take place in the coming weeks, I'll post that of course.
About the painting; it needs some but it also would be nice to kieep the sight on the metal tube frame which Claude made so beautiful.
Amicalement,
Vincent (DB) |
|
| Revenir en haut de page |
|
|
|